Making Dashboards with Templates
Creating dashboards has never been this simple! We understand that crafting the perfect dashboard can often be a daunting task, especially if you're new to the world of data visualization.
In this article, we'll explore what dashboard templates are and how they work, so you can leverage them to enhance your dashboarding experience.
What Are Dashboard Templates?
Dashboard templates are pre-designed examples of dashboards, each curated for a different industry or use case. These templates come fully equipped with a rich assortment of widgets and design elements, ready to be transformed into a remarkable dashboard.
The unique feature of these templates is that they lack one crucial component – your data. They stand ready for you to fill them with your data, thereby populating them with the information that matters to you.
In essence, these templates serve as examples of dashboards for various purposes. You can effortlessly duplicate, edit, and customize them to suit your specific requirements, all within the dashboard editor.

Getting Started with Dashboard Templates
Ready to embark on your dashboard creation journey with templates? Here's how to get started:
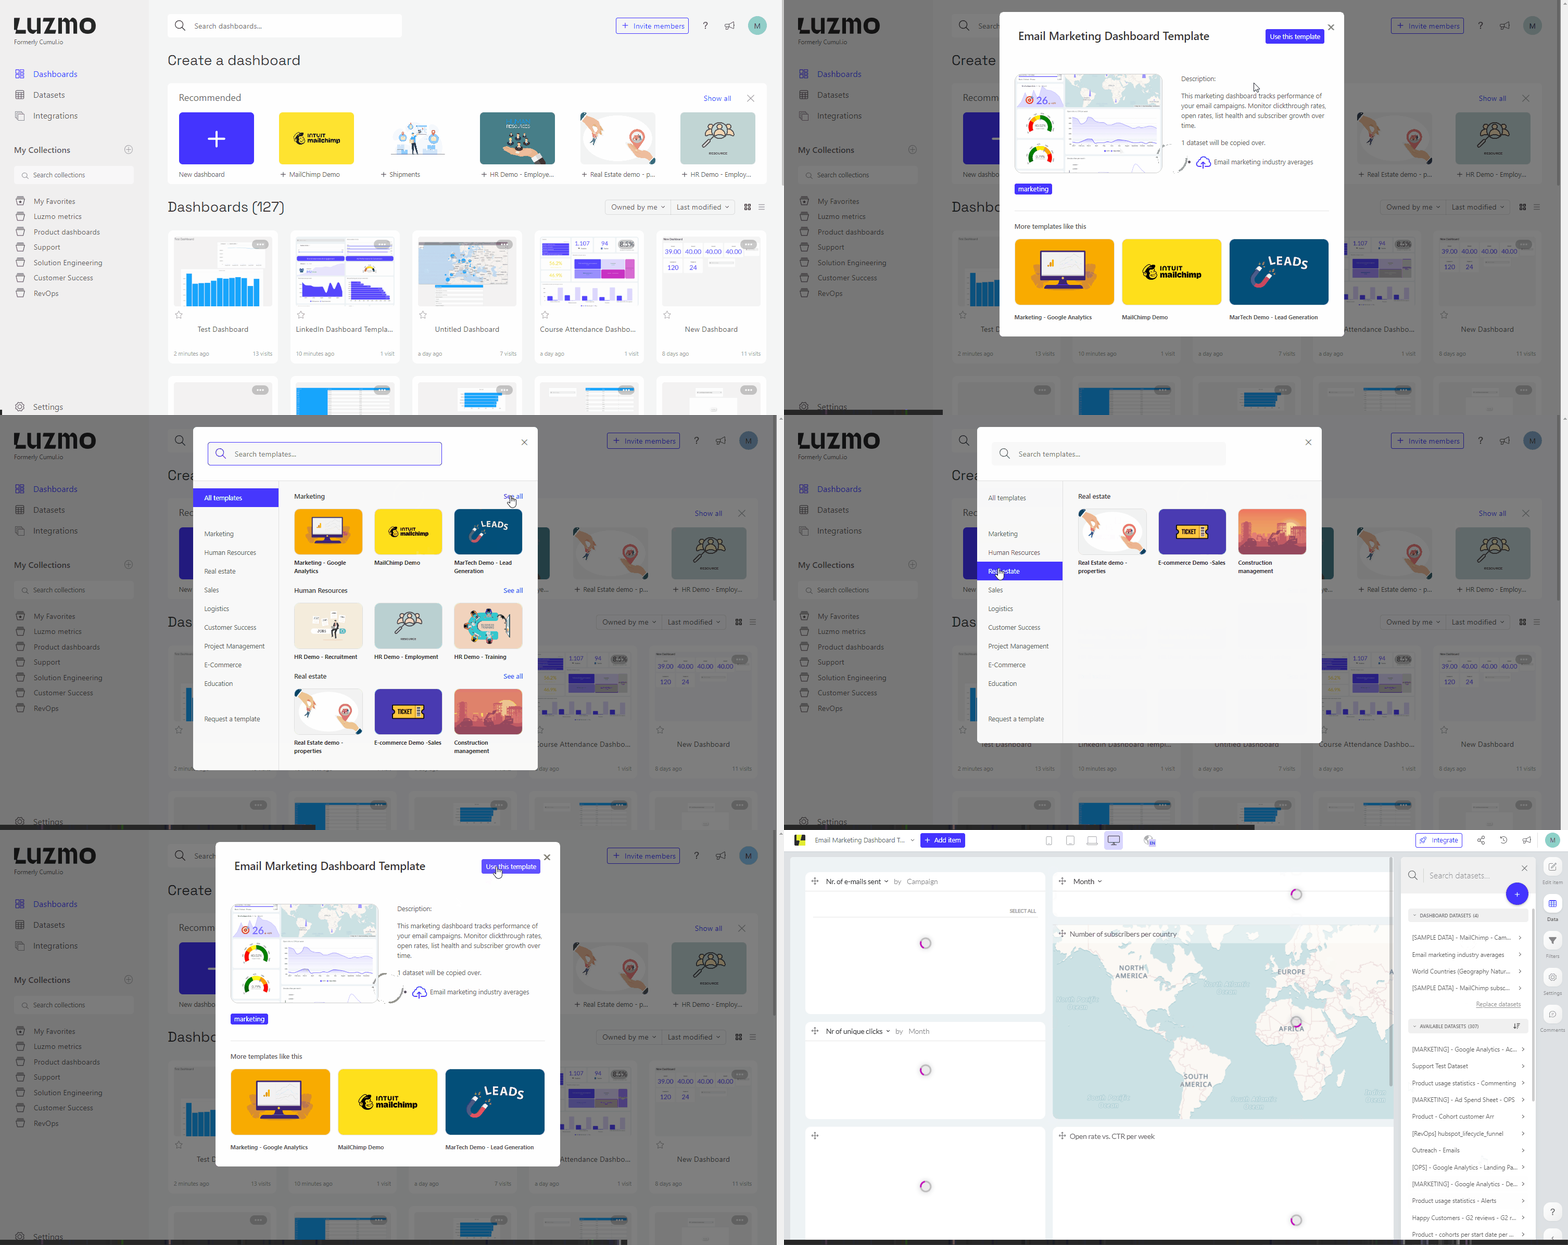
Access the Dashboard Overview Page: Log in to your Luzmo account and navigate to your dashboard overview page. At the top of the page you'll find an array of available templates to choose from.
Browse and Select: You can browse through the templates by clicking “show all” to discover the one that aligns best with your use case and objectives. Once you've made your selection, Luzmo will generate a new dashboard for you, complete with sample data.
Add Your Data: This is where your dashboard truly comes to life. Easily integrate your own data into the template by dragging and dropping elements or utilizing our "replace datasets" feature.
Customize to Perfection: From this point onward, the creative reins are in your hands. Tailor the design and layout of your dashboard elements to align seamlessly with your specific needs and goals.
Using the 'Replace Datasets' Feature
One of the most powerful tools at your disposal when working with dashboard templates is the 'Replace Datasets' feature. Here's how you can use it to easily swap out the template data with your own:
Replace Datasets: While in the dashboard editor, navigate to the "Data" section of your dashboard. You will see the 'Replace datasets' option below the template datasets. Click on 'Replace datasets' to initiate the process.
Edit Mapping: After clicking 'Replace datasets', you'll see an 'Edit' icon next to the datasets. Click on 'Edit' to start configuring the replacement dataset.
Select Your New Dataset: Choose the dataset you want to replace the template data with from the available options.
Map the Fields: Map the fields in the old dataset to the corresponding columns in your new dataset. This ensures that the data seamlessly transitions from the template to your dataset. All the used columns of the old dataset should be mapped to a replacement column from the new dataset.
You can read more about the “Replace Datasets” feature by visiting this article in our Academy: Replace datasets.
And that's it! With this feature, you can effortlessly integrate your own data into the template, transforming it into a powerful, customized dashboard tailored to your unique needs.
Re-Enabling Templates in Dashboard Creation
If you've previously disabled the display of dashboard templates but wish to bring them back, Luzmo provides an easy way to re-enable this feature. Follow the steps below to include dashboard templates in your my dashboard page:
Navigate to the "Personalization" section of your Luzmo profile. You can access your profile settings by clicking on your profile icon in the top right-hand corner and selecting "Profile."
Within the Personalization section, locate the option titled "Show 'Dashboard Templates' section on dashboard overview page." Click on the toggle switch next to the mentioned option to enable the display of the "Dashboard Templates" section on your dashboard overview page.