Custom events
Custom events allow interaction between your dashboards and your own application. By surfacing chart information from a dashboard into your application, you can create flexible and powerful workflows that drive interactivity between your end users and their analytics.
What are custom events?
A custom event allows you to trigger an action based on the specific data your user clicked on in a dashboard widget embedded into your application. In other words, this means you can reuse the data elsewhere in your platform, or you can trigger an action inside your platform based on the emitted data. For example:
Above you’ll see that clicking on any bar gives us three actions in a dropdown which are all "Custom events" on which the parent application can act. The first action opens a drillthrough dashboard in a modal with more details about the campaign, the second action opens a modal with a image preview of the campaign, while the last option navigates the user to another page in the parent application where they can configure the campaign.
Listeners for custom events can be made on any Luzmo embedding component. For more information, check out our Embedding libraries!
Using custom events in embedded dashboards
Imagine you have a platform where your customers can manage their marketing campaigns. Inside the platform, your users can access a dashboard that provides a clear high-level overview of the main KPIs your users are interested in, ensuring they get their desired insights in no time.
This high-level overview Luzmo dashboard is the same for each of your users (see this Academy course on how that was achieved). In the example above, the stacked bar chart displays the number of clicks per campaign and channel by default. With custom events, your customer can select a campaign they are interested in, and:
- See more details on a specific campaign in a dynamically filtered drillthrough dashboard (e.g. to get more detailed data on a campaign that is not performing as expected)
- Get a preview of the Facebook and Marketing campaigns
- Edit the existing campaign for a specific channel
- etc.
With Custom events, there is a lot of flexibility in the interactivity and actionabililty that you can provide to your platform's users on top of the dashboard's insights! Based on the specific data point that was clicked on, the custom event emitted through our frontend component will include its data along with any extra data properties you set up in the custom event modal (see below).
Enabling Custom events
To set up one or multiple Custom events on a widget, open your desired dashboard in our editor and navigate to the Widget's settings (by hovering over the widget and clicking on the gear wheel). You can enable Custom events under the Interactivity section, which will open a modal to set up the custom events.
You can give each event a name and a label:
- The label will be displayed in a dropdown when a user clicks on a data element of the widget.
- You could use the name of your custom event in your implementation to perform a specific action in your application when a specific event name is emitted.
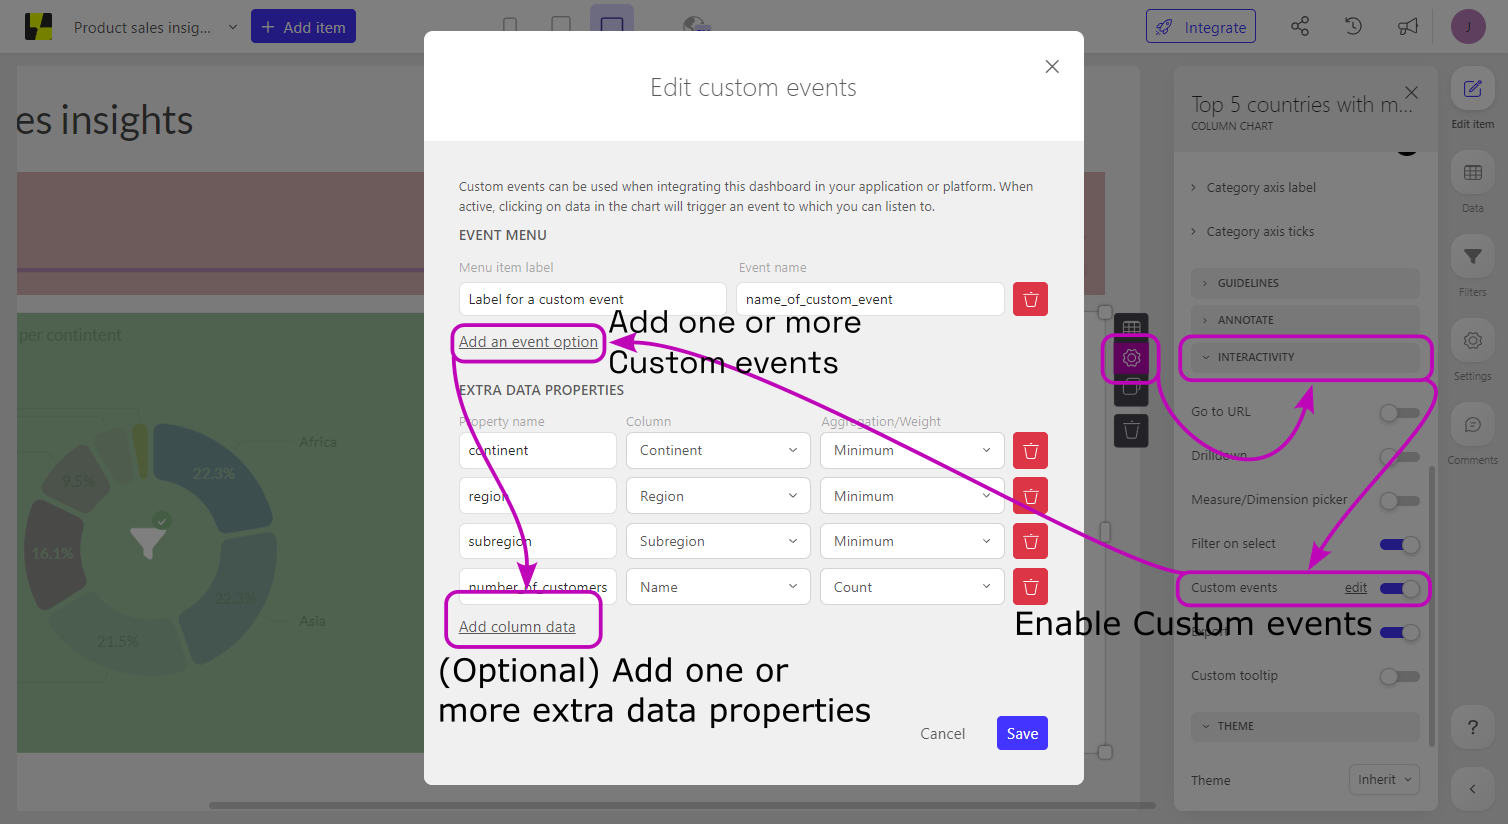
Extra data properties
Next to that, you can optionally also set up one or multiple extra data properties that are not included in the widget's slots: this could be useful in case your implementation would need additional information about the data point to set up your desired functionality!
- Each of these extra data properties will be queried when that widget queries data, so make sure to only include relevant extra data properties to ensure the most optimal querying performance.
- All extra data properties will be emitted with each of the custom events set up on this widget, along with the data point that was clicked on in the widget.
Some example use-cases where this might be useful for:
- Your widget shows one or more resource's name, but your desired interactivity would require the resource's ID to be available within the custom event.
- You are showing the lowest level of a hierarchical data element (e.g. countries), but would like to retrieve the associated (sub)parent levels which are available in other columns (e.g. subregion, region, continent).
- You want to retrieve the latest (or earliest) date associated to a specific data point
- etc.
More information on the different possibilities and expected results of such extra data properties can be found in this Academy article.
Listening for Custom events
You can find the necessary code snippet to set up an event listener in our developer documentation. Once a Custom event is emitted, the data property of the emitted event contains information about the widget and the specific data point that was clicked. You can find a generic structure of the emitted event in our Developer documentation.
Drillthrough dashboards example
Check out this Academy article, where we explain how to implement drillthrough dashboards using custom events; it provides a step-by-step guide to walk you through the initial setup in Luzmo and your application, including some minimal code snippets where applicable!
Please don't hesitate to reach out to our Support team in case you would have any further questions around setup or usage of Custom events. We're here to help!